Hands-On RAG with AWS Bedrock and S3 Vector Store

Explore more from ADaSci
Imagine giving your HR policy documents a “brain” that not only remembers them, but also answers questions as if it’s a real expert. With Amazon S3 Vectors and Bedrock Knowledge Bases, you can turn static documents into a smart chatbot without managing any vector database! Simply upload your policies to S3, sync them via Bedrock, and you’ll have semantic retrieval and answer generation built in. It’s amazing how AWS handles embedding, chunking, indexing, and querying for you. Curious how it all ties together and how you can build this yourself in under 10 minutes? Let’s dive into RAG on AWS!

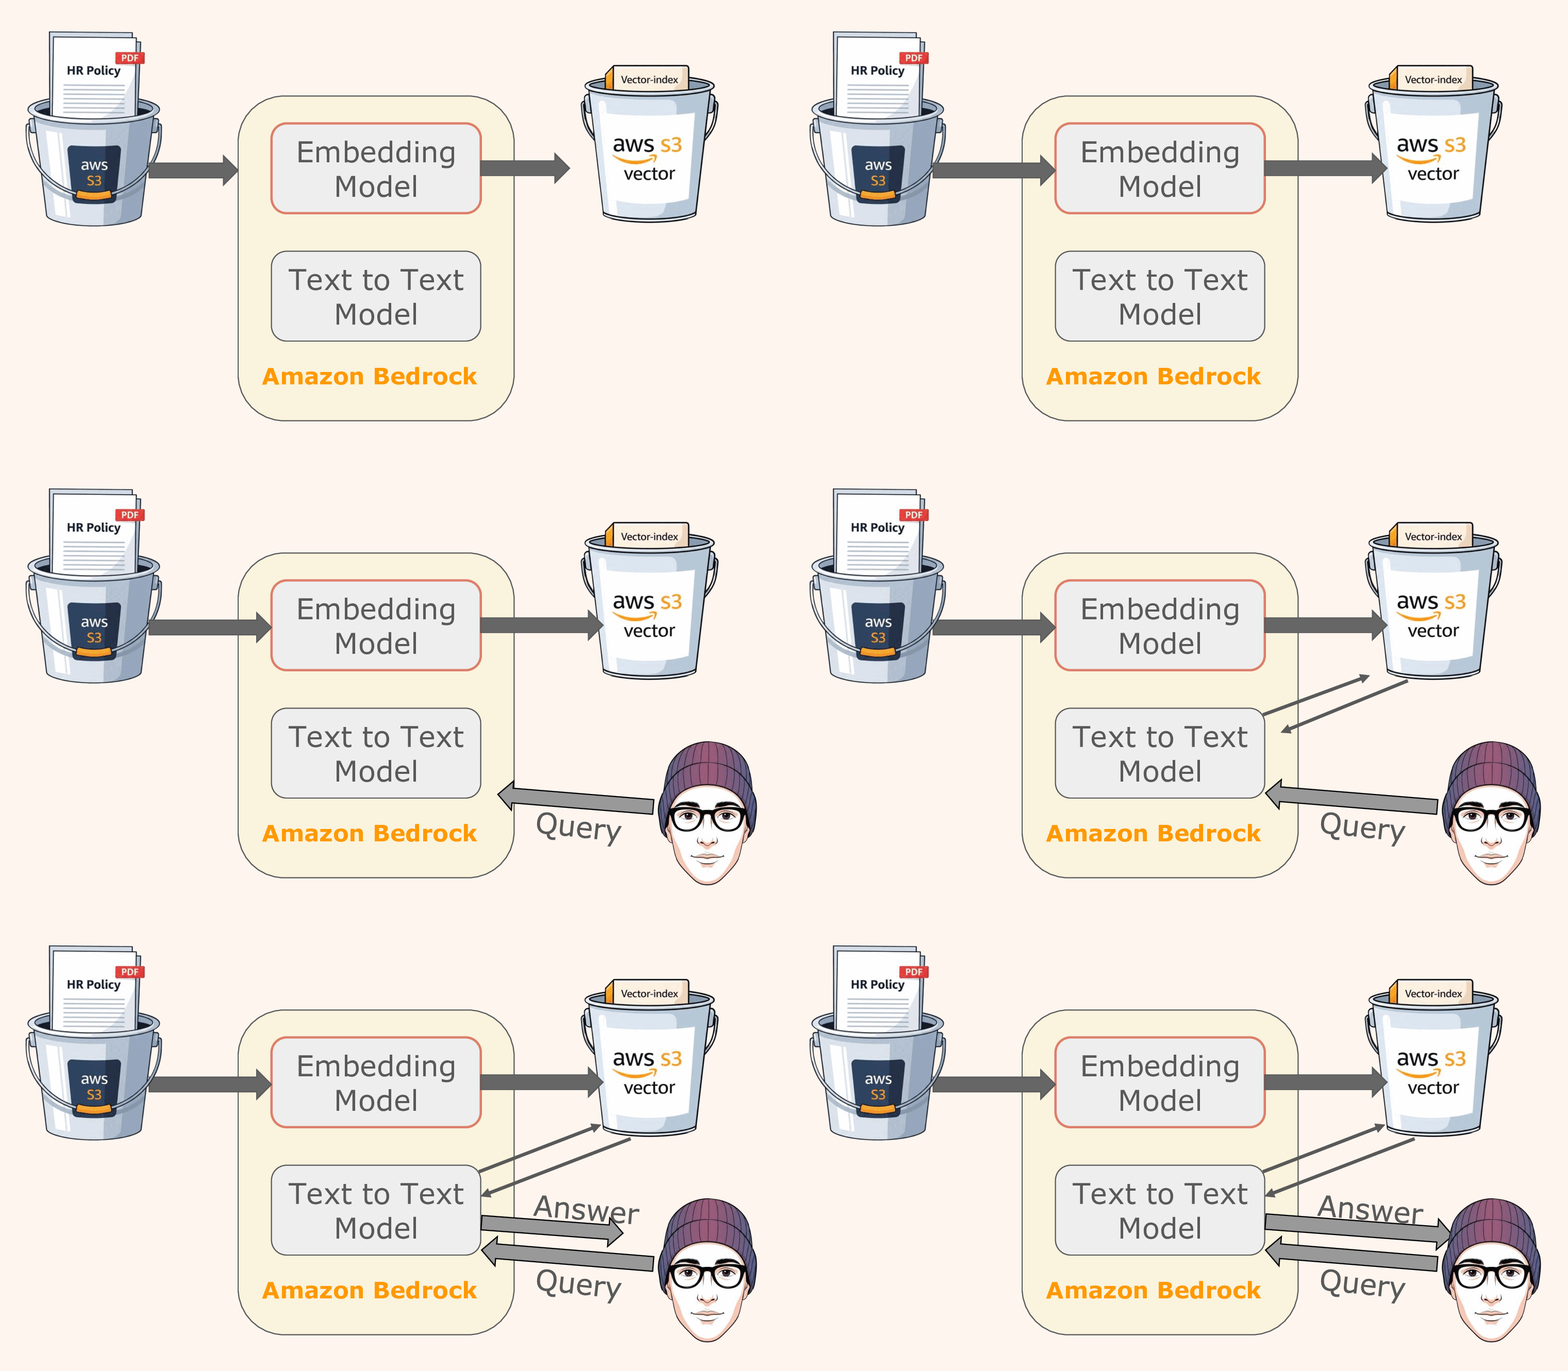
High-level view of architecture
Table of contents
- Setting up the Document in the S3 Bucket
- Grant the Required Model-Access on Bedrock
- Creating a Knowledge Base on Bedrock
- Configuring the Knowledge Base
- Preparing to Test the Knowledge Base
- Interpreting the Test Response
Setting up the Document in the S3 Bucket
First, let’s securely store the HR policy in an S3 bucket so Bedrock can access it. Sign in to the AWS Management Console and open the S3 service. If you don’t already have a bucket, create one by clicking Create bucket, selecting a unique name and region, then saving it. Next, click on your bucket name, select Upload, and either drag your ‘hr-policy.pdf’ file or use Add files to select it. Finally, click Upload to begin the upload. Once complete, you’ll see hr-policy.pdf listed as an object in your bucket. That’s it—the file is now stored in S3, ready for Bedrock to build your knowledge base.
S3 bucket with HR policy document
Grant the Required Model-Access on Bedrock
Before Bedrock can build your knowledge base, you must activate access to both the embedding and text-to-text models. In this guide, we’re enabling Titan Text Embeddings V2 to convert your HR policy into vectors, and DeepSeek‑R1 to generate human-readable responses. To do so, log into the Bedrock console, go to Model access, and request access for both models. Once approved, your account will display them as ‘Active’ as shown here.
Model access page showing active models
It’s also critical to confirm that both models are supported in the AWS region where you’re working. ‘Titan Text Embeddings V2’ is available in US East (N. Virginia) and US West (Oregon), and DeepSeek‑R1 support may vary by region. Ensuring model availability in your chosen region avoids sync issues down the line.
Creating a Knowledge Base on Bedrock
Once your documents are in S3 and models are activated, it’s time to set up your Knowledge Base. In Bedrock, a knowledge base connects your content in S3 with the chosen embedding model (e.g., Titan Text Embeddings V2) and generation model (e.g., DeepSeek R1) via a vector store. Navigate to the Knowledge bases section and begin “Create knowledge base.” You’ll need to assign a service IAM role to grant Bedrock access to your S3 content and embedding operations
Creating a knowledge base
During setup, you can enable logging by configuring “log deliveries” to Amazon S3, so ingestion job status and document parsing details are automatically recorded in your own S3 bucket
Configuring the Knowledge Base
Once you’ve linked the data source in S3, the next step is to set up how your knowledge base processes and stores that content. Begin by defining which files Amazon Bedrock should ingest. Specify your S3 bucket. During this step, Bedrock also lets you choose how to parse and chunk your document. For example, fixed-size chunks or content-based breakpoints. Note that parsing and chunking settings are locked in and cannot be changed later, so choose wisely.
Configuring the knowledge base
Next, select your embedding model (e.g., Titan Text Embeddings V2) and set vector configuration, such as dimensions (e.g., 1,024) and data type (e.g,. float32). Then, choose your vector store, which is Amazon S3 Vectors in this case. There are two options: either letting Bedrock quick-create a new S3 vector store or linking to an existing vector index. Ensure the embedding model’s configuration matches your vector index, as mismatched dimensions will cause ingestion to fail.
Once the configuration is complete, hit the Sync button inside the Bedrock console to trigger ingestion. Bedrock will scan your S3 files, chunk them according to your strategy, generate embeddings, and store them in the vector index. Sync is incremental, meaning future syncs will only process changed, added, or deleted files. You can track ingestion progress, warnings, or failures via the Sync history UI.
Preparing to Test the Knowledge Base
Once you’re ready to test, go to the Amazon Bedrock console, select Knowledge Bases in the left menu, and choose your knowledge base (e.g., kb‑01). Then click Test knowledge base, and a panel will slide out on the right side for interaction. Inside that panel, toggle Generate responses on to enable response generation from the retrieved content. This tells Bedrock to use the LLM to process results and produce a human‑friendly answer with citations. Click Select model, choose your text‑to‑text model (e.g., DeepSeek R1), and click Apply to set it for response generation.
Setting up the text-to-text model in Bedrock
Interpreting the Test Response
When you submit a query in the Test Knowledge Base panel, Bedrock springs into action: Titan embeddings fetch the most relevant text chunks from your documents. The DeepSeek R1 model is then used to generate a concise, human-readable answer, with both citations and source excerpts clearly displayed. In the chat panel, you can click on each citation to view the original context from the document chunk. Want more control? Click the configuration icon to tweak settings like maximum source chunks, search type (semantic vs. hybrid), metadata filters, or inference parameters, ensuring your RAG output matches your needs.
Response for a sample query
Final Words
You’ve now built an end‑to‑end Retrieval‑Augmented Generation (RAG) system, from uploading your document to testing queries, all in a fully managed environment. Don’t forget to clean up! Once you’ve finished experimenting, delete your Bedrock knowledge base, S3 buckets (both document and vector store buckets), and any compute resources. These services continue to incur charges even when idle.
If considering deployment, containerize your UI and backend and deploy via ECS Fargate + CloudFront (using AWS CDK or Terraform) for scaling, security, and HTTPS support. Alternatively, use Elastic Beanstalk or App Runner for quicker, simpler container deployment. For smaller POCs, even a single EC2 instance running your Streamlit app with a reverse proxy (Nginx) works well. Each approach offers trade‑offs between automation, cost, and scalability; pick what fits your needs best.

![[Upcoming Webinar] Autonomous Enterprises: How to leverage Agentic AI in Enterprises?](https://adasci.org/wp-content/uploads/2025/10/Adasci-Webinar-1-300x300.png)


