
Ever wished you had a personal ad agency at your fingertips? In today’s fast-paced digital landscape, crafting compelling ad copy for various platforms can be a time-consuming challenge. This hands-on article will guide you through building your very own AI-powered Ad Copy Generator using Streamlit for an intuitive user interface and LlamaIndex with Google’s Gemini 1.5 Flash for intelligent ad generation. We’ll then elevate your creation by demonstrating how to containerize your application with Docker and seamlessly deploy it on AWS EC2, ensuring your ad copy magic is accessible from anywhere! Get ready to revolutionize your marketing efforts.
In our Ad Copy Generator, LlamaIndex acts as the crucial orchestration framework that empowers the Gemini 1.5 Flash LLM to interact intelligently with our custom application logic. While Gemini excels at generating human-like text, it’s not inherently designed to know when to call a specific Python function or how to integrate seamlessly into a dynamic workflow like ours.
LlamaIndex provides the “agentic capabilities” we need. It allows us to define tools that are accessible to the LLM. It then enables the Gemini model to reason about when and how to use this tool. When we prompt the agent with “Generate ad copy for Facebook,” LlamaIndex’s agent picks the right tool, identifies “Facebook” as the argument for a pre-defined function, and executes it, ultimately returning the tailored ad copy. This intelligent decision-making and tool-use by LlamaIndex is what transforms a simple LLM call into a powerful, application-aware AI system.
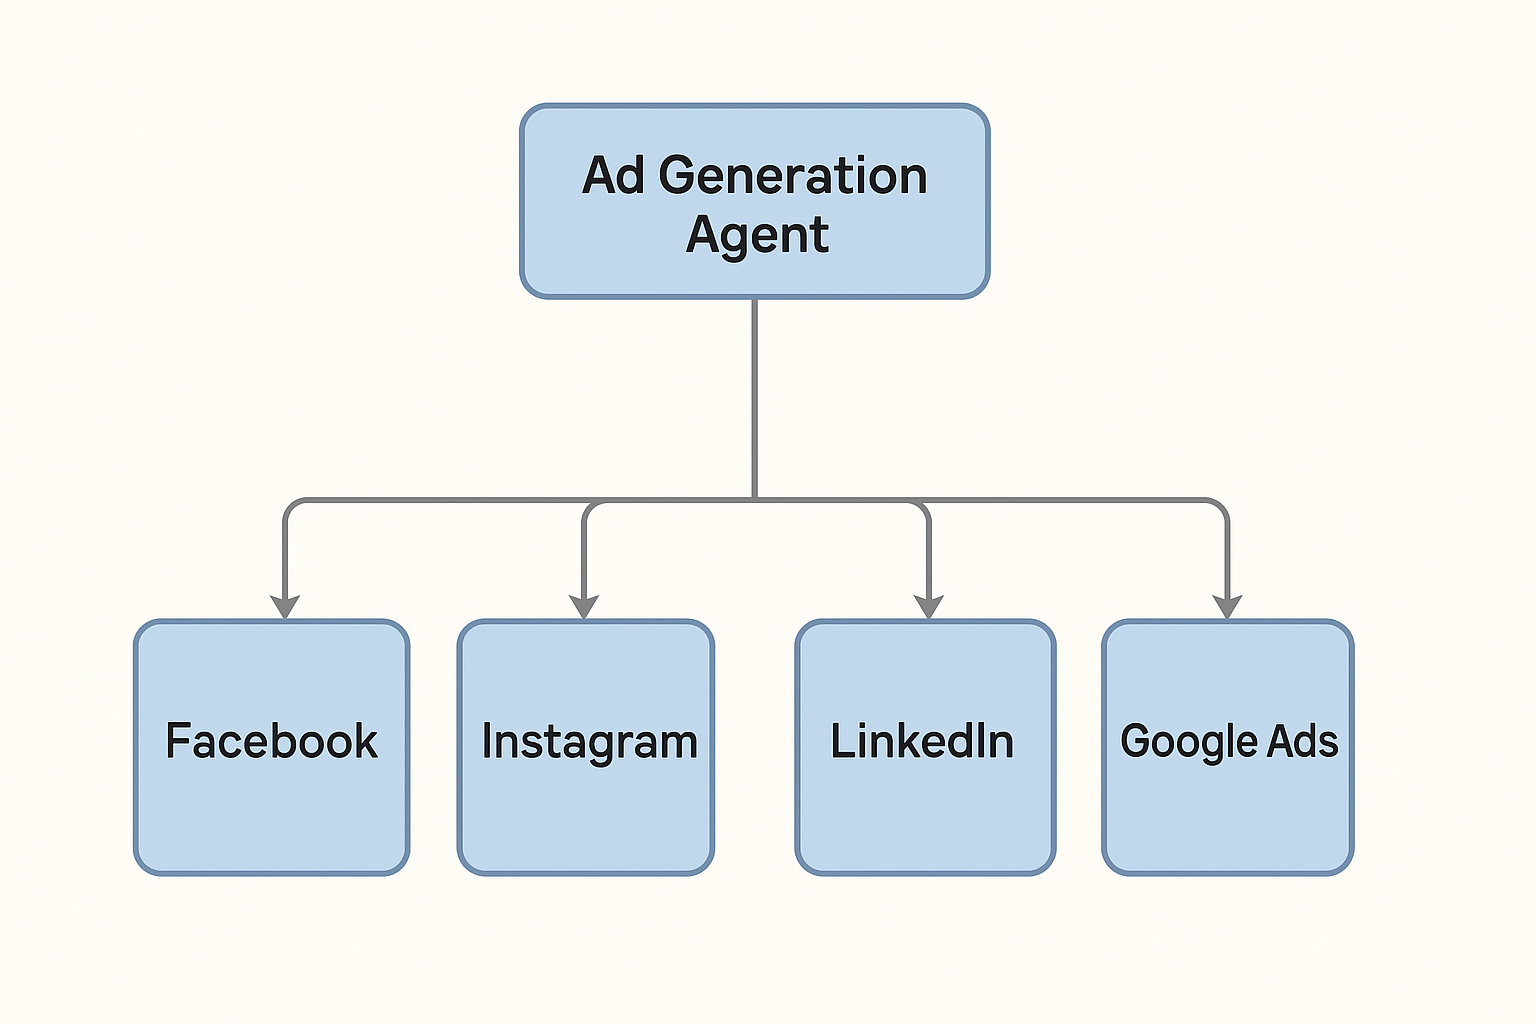
Ad-generation agent flowchart
import os
from dotenv import load_dotenv
from llama_index.llms.gemini import Gemini
from llama_index.core.tools import FunctionTool
from llama_index.core.agent import FunctionCallingAgentWorker, AgentRunner

load_dotenv()
llm = Gemini(model="models/gemini-1.5-flash", api_key=os.getenv("GEMINI_API_KEY"))
We kickstart our application by setting up the necessary environment and initializing our large language model. First, we import essential libraries: os for environment variables, dotenv to load them, and key LlamaIndex components like Gemini, FunctionTool, FunctionCallingAgentWorker, and AgentRunner. The load_dotenv() call is crucial, as it loads environment variables from a .env file located in the project’s root directory.
# --- Define the ad generation function (must accept arguments) ---
   def generate_ad(platform: str) -> str:
       prompt = (
           f"Generate a high-converting ad copy for {platform}.\n"
           f"Product Details:\n{context}\n\n"
           f"Requirements:\n"
           f"- Tailor the ad copy for {platform} audience.\n"
           f"- Match the campaign goal: {campaign_goal}.\n"
           f"- Keep the tone: {tone}.\n"
           f"- Use an engaging Call-to-Action.\n"
       )
       response = llm.complete(prompt)
       return response.text.strip()
This Python function generate_ad is the heart of our ad copy generation logic. It takes a platform (like “Facebook” or “Instagram”) as input, which is crucial for tailoring the ad. The function constructs a detailed prompt by embedding all the user-provided campaign details (product name, description, target audience, goal, tone) into a clear instruction for the Gemini 1.5 Flash LLM. This ensures the generated ad copy is highly relevant and customized.
# --- Wrap the function as a FunctionTool with correct signature ---
   ad_tool = FunctionTool.from_defaults(
       fn=generate_ad,
       name="generate_ad",
       description="Generate ad copy for a specific platform. Accepts platform name as argument.",
   )

# --- Create a single agent with the tool ---
   ad_agent = FunctionCallingAgentWorker.from_tools(
       [ad_tool],
       llm=llm,
       system_prompt="You are an expert ad copywriter. You generate high-converting ads\
             for specific platforms using structured inputs.",
   )
This crucial step is where we bridge our custom ‘generate_ad’ Python function with the intelligent capabilities of the Gemini LLM, orchestrated by LlamaIndex. First, we transform our generate_ad function into a FunctionTool. This makes it discoverable and usable by the LLM. Next, we create the ‘FunctionCallingAgentWorker’. This agent is powered by our llm (Gemini) and is explicitly given access to our ad_tool. We also provide a system_prompt, essentially instructing the agent on its role: to act as an “expert ad copywriter.” This setup enables the agent to intelligently decide when to call our generate_ad tool and pass the correct platform argument, automating the ad generation process based on user requests.
# --- Generate ad copies for all platforms ---
   platforms = ["Facebook", "Instagram", "LinkedIn", "Google Ads"]
   ad_copies = {}

   for platform in platforms:
       response = ad_runner.chat(f"Generate ad copy for {platform}")
       ad_copies[platform] = response.response
This code block orchestrates the core task of generating tailored ad copies for multiple platforms. We define a list of platforms including “Facebook,” “Instagram,” “LinkedIn,” and “Google Ads.” The code then iterates through each platform. In each iteration, it leverages the ad_runner (our LlamaIndex agent) to “chat” with a specific request: “Generate ad copy for [platform name].”
Crucially, the ad_runner, equipped with the FunctionTool we previously defined, understands this natural language request. It intelligently calls our generate_ad function, passing the current platform as an argument. The response, which is the platform-specific ad copy generated by Gemini, is then stored in the ad_copies dictionary. This loop efficiently automates the creation of diverse ad content, customized for each advertising channel.
import streamlit as st
# Page Config
st.set_page_config(
   page_title="Ad Copy Generator",
   page_icon="🚀",
   layout="centered",
)

# App Header
st.title("🚀 Ad Copy Generator")
st.subheader("Fill out the campaign details below to generate ad copies")
This code block lays the groundwork for our interactive user interface using Streamlit, an open-source Python framework for rapidly building web applications. Streamlit excels at transforming data scripts into shareable web apps with minimal effort. The ‘set_page_config()’ customizes the browser tab’s page-title to “Ad Copy Generator,”. ‘st.title()’ displays a prominent main header “Ad Copy Generator” on the page. ‘st.subheader()’ adds a secondary heading, guiding users to “Fill out the campaign details below to generate ad copies.” This initial setup creates the visual foundation and introduces the purpose of our application to the user.
with st.form("ad_copy_form"):
   st.markdown("### 📦 Product Details")
   product_name = st.text_input("Product Name")
   product_description = st.text_area("Product Description")
   problem_solved = st.text_area("The Problem It Solves")
   usp = st.text_input("Unique Selling Proposition (USP) [Optional]")

   st.markdown("### 🎯 Target Audience")
   age_group = st.selectbox(
       "Target Age Group",
       ["18-24", "25-34", "35-44", "45-54", "55+"]
   )
   gender = st.selectbox(
       "Target Gender",
       ["All Genders", "Male", "Female", "Non-binary"]
   )

   st.markdown("### 🏆 Campaign Settings")
   campaign_goal = st.selectbox(
       "Campaign Goal",
       ["Lead Generation", "Sales", "Brand Awareness", "Website Visits"]
   )
   tone = st.selectbox(
       "Desired Tone",
       ["Friendly", "Professional", "Fun"]
   )
This code block constructs the interactive input form that allows users to define the parameters for their ad campaigns. Encapsulated within a st.form(“ad_copy_form”), it organizes various input fields into logical sections. Users can provide “Product Details” such as product_name, product_description, problem_solved, and an optional usp using text input and text area widgets. The “Target Audience” section utilizes st.selectbox for age_group and gender, offering predefined choices for easy selection. Finally, “Campaign Settings” include select boxes for campaign_goal and tone, enabling users to specify their marketing objectives and desired communication style. This form collects all the necessary context to generate highly tailored ad copies.
 # --- Display ad copies ---
   st.success("✅ Ad Copies Generated Successfully!")
   st.markdown("### ✨ Preview of Ad Copies:")
   for platform, copy in ad_copies.items():
       with st.expander(f"{platform} Ad Copy"):
           st.write(copy)
Once the AI agent has finished its task, this code block handles the presentation and accessibility of the generated ad copies. First, it reassures the user with a prominent success message: st.success(“Ad Copies Generated Successfully!”). Following that, it introduces the output clearly with st.markdown(“Preview of Ad Copies:”).
The core of this section is a loop that iterates through the ‘ad_copies’ dictionary, which holds the generated ad copy for each platform. For every platform and its corresponding copy, Streamlit’s st.expander creates a collapsible section. This allows users to neatly view each ad copy by expanding its respective platform section, keeping the interface clean and organized.
Containerization is a best practice for packaging applications, ensuring they run consistently across different environments. Docker is the industry standard for this process. The first step is creating a Dockerfile, a text file containing instructions to build a Docker image. This file specifies the base image (e.g., Python), copies your application code, installs dependencies, and defines the command to start the application.
FROM python:3.10-slim

WORKDIR /app

COPY requirements.txt ./
RUN pip install --no-cache-dir -r requirements.txt

COPY . .

EXPOSE 8501

CMD ["streamlit", "run", "marketing.py", "--server.headless=true", \
"--server.port=8501", "--server.address=0.0.0.0"]
After creating the Dockerfile, you use the docker build command to create a portable, self-contained image of your application. To facilitate offline deployment or transfer to a machine without a Docker registry, you can save the image as a single archive file using docker save. This command exports the image layers and metadata into a .tar file, which is a highly convenient way to bundle and move the entire application and its dependencies as a single unit.
To host our application, we’ll provision a virtual machine (VM) on Amazon EC2, AWS’s Infrastructure as a Service (IaaS) offering. We’ve selected the t2.micro instance type, part of the AWS Free Tier, which provides a balanced resource allocation (1 vCPU, 1 GiB RAM) ideal for development. The chosen operating system is the secure Amazon Linux 2023 AMI.
A critical security step is creating and downloading a key-pair, which is the sole method for secure SSH access (Port 22) to the VM. The private key remains on your local machine, ensuring authorized connections. Upon launch, you’ll receive a public IP address for remote operations.
Network configuration is managed via security groups, acting as virtual firewalls. We’ll create inbound rules:
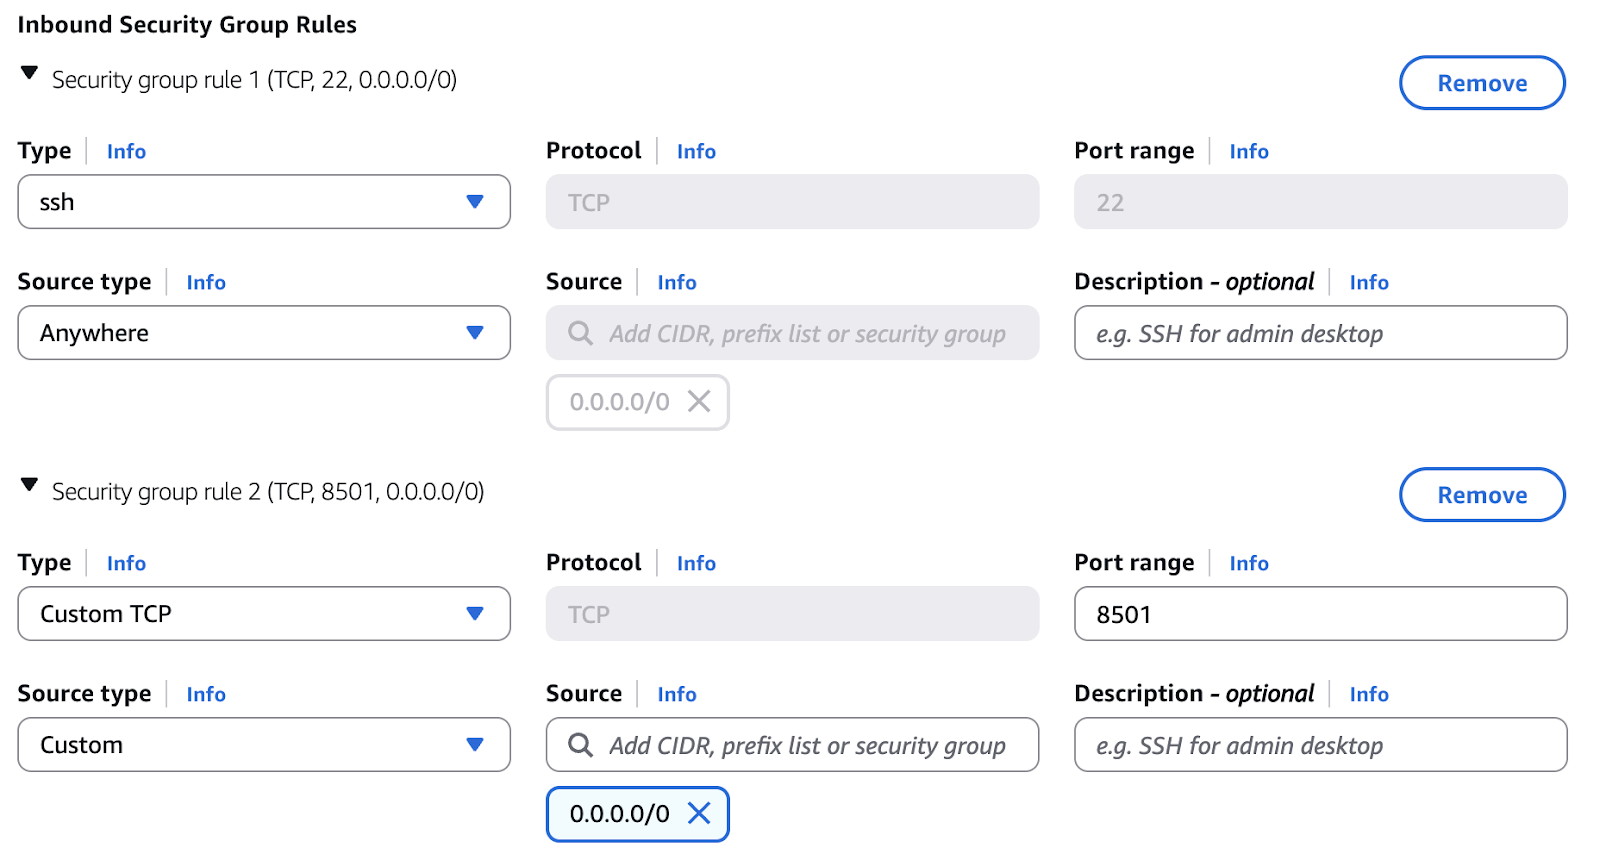
Configuring security bound rules on AWS
docker buildx build --platform linux/amd64 -t ad-generator:latest --load .

docker save -o marketing.tar ad-generator:latest

chmod 400 marketing.pem

scp -i marketing.pem marketing.tar ec2-user@13.233.79.194:~/

ssh -i marketing.pem ec2-user@13.233.79.194

docker load -i marketing.tar
With the Docker image packaged as a .tar file, the next step is to transfer it securely to your EC2 virtual machine. This process begins by first building the image for the correct platform and then saving it to a local archive file. Before transfer, a crucial security measure is to set the correct permissions on your private key file, ensuring it is only readable by you. The scp (Secure Copy Protocol) utility, which uses the same SSH protocol for encrypted data transfer, is then used to copy the archive to the remote server. The command syntax specifies the private key file for authentication, the local path of the .tar file, and the remote destination using the default user for Amazon Linux (ec2−user), the instance’s public IP address, and the destination path. Once the file is copied, you can log in to the EC2 instance via SSH and use docker load to extract the image from the archive, making it available on the virtual machine’s local Docker environment.
Proper handling of environment variables and secrets is critical for maintaining application security and flexibility. Hardcoding sensitive information like API keys, database credentials, or access tokens directly into your source code or Docker image is a significant security risk. Instead, you should manage these values externally. After SSH-ing into your virtual machine, you can create a .env file using a command-line text editor like nano by typing nano .env and adding your credentials, such as GEMINI_API_KEY=”your_actual_api_key_here”.
This file should be included in your .dockerignore to prevent it from being committed to version control. When launching the Docker container, there are two primary ways to pass these variables. The first method uses the –env-file flag to load all variables from your created .env file. The second method uses the -e flag to pass each environment variable individually on the command line. While both approaches ensure configuration is decoupled from the application code, using a .env file is often preferred as it keeps the launch command clean and is more scalable for managing numerous settings across different environments without rebuilding the Docker image.
# Way 1: Using --env-file

docker run -d --name marketing-app -p 8501:8501\
 --env-file .env ad-generator:latest

# Way 2: Using -e flag for each variable

 docker run -d --name marketing-app -p 8501:8501 \
-e GEMINI_API_KEY="your_actual_api_key_here" \
ad-generator:latest
You’ve now built and deployed a powerful AI Ad Copy Generator, a significant step in automating your marketing efforts! But this is just the beginning. To truly elevate your AI marketing assistant, consider extending its capabilities. Future enhancements could include,
Integrating pre-defined ad templates (e.g., specific formats for Facebook Carousel Ads or Google Responsive Display Ads) that the AI can populate. Instead of just text, the AI can be empowered to suggest relevant image concepts or even generate placeholder images using other models (like Diffusion models) to complement the ad copy. Additionally, it can be connected with ad platform APIs to analyze the performance of generated ads, creating a feedback loop for continuous improvement. By continuously iterating and adding more sophisticated features, you can transform this project into an even more indispensable tool for your marketing arsenal!


![[Upcoming Webinar] Autonomous Enterprises: How to leverage Agentic AI in Enterprises?](https://adasci.org/wp-content/uploads/2025/10/Adasci-Webinar-1-300x300.png)