
Ever wished your AI assistant could “see” and understand what’s on your screen, just like you do? Imagine an intelligent agent that can read documents, extract key information from web pages, and answer questions about the digital environment you’re currently interacting with. This hands-on guide will walk you through building such a screen-aware AI agent. We’ll leverage ScreenEnv to capture visual context, Tesseract OCR to transform pixels into readable text, and LlamaIndex to enable a Google Gemini-powered LLM to understand and query that on-screen information intelligently.
In the realm of building intelligent agents that interact with graphical user interfaces (GUIs), a common challenge is programmatically ‘seeing’ and controlling the screen. This is where ScreenEnv comes in. ScreenEnv is a powerful Python library designed to create and manage virtual screen environments, primarily for testing and automation. It provides a standardized way for AI agents or automated scripts to interact with applications running within a controlled, observable display.
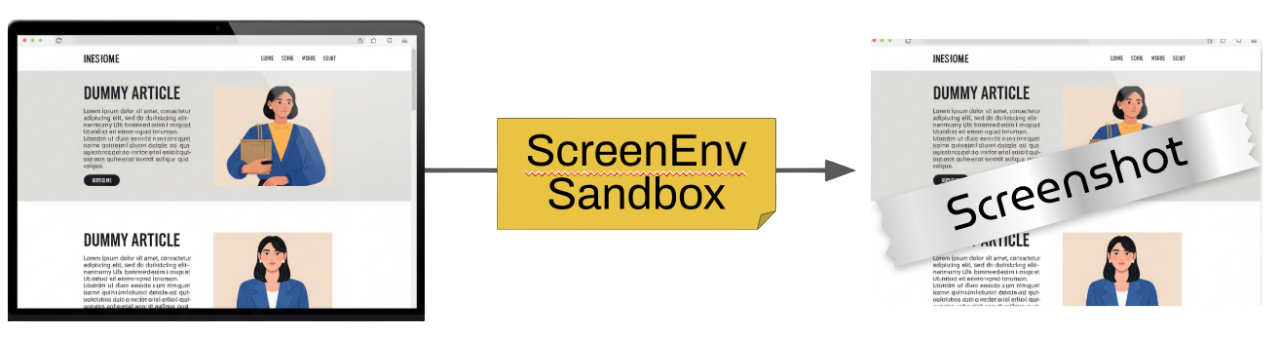
Working of ScreenEnv Sandbox
Unlike simple screenshot tools, ScreenEnv provides a more robust and repeatable approach to GUI automation, offering capabilities that extend beyond just capturing pixels. For our screen-aware AI, ScreenEnv will serve as the ‘eyes’, allowing our system to programmatically take screenshots of the current display. While ScreenEnv itself can create virtual displays, we’ll extend it with a custom ‘PatchedSandbox’ class to capture actual screenshots of your live desktop, bridging the gap between a controlled environment and real-world observation. This ensures our AI can process what you’re genuinely seeing.
To enable our AI to understand the visual information captured from the screen, we need to convert pixels into characters. This is where Tesseract OCR (Optical Character Recognition) comes into play. Tesseract is a powerful, open-source OCR engine originally developed by Hewlett-Packard and now maintained by Google. Its core function is to analyze images, identify textual regions, and then translate those regions into searchable, editable text. It’s effectively the “reading brain” for our screen-aware AI, transforming what the screenEnv “sees” into digestible data.
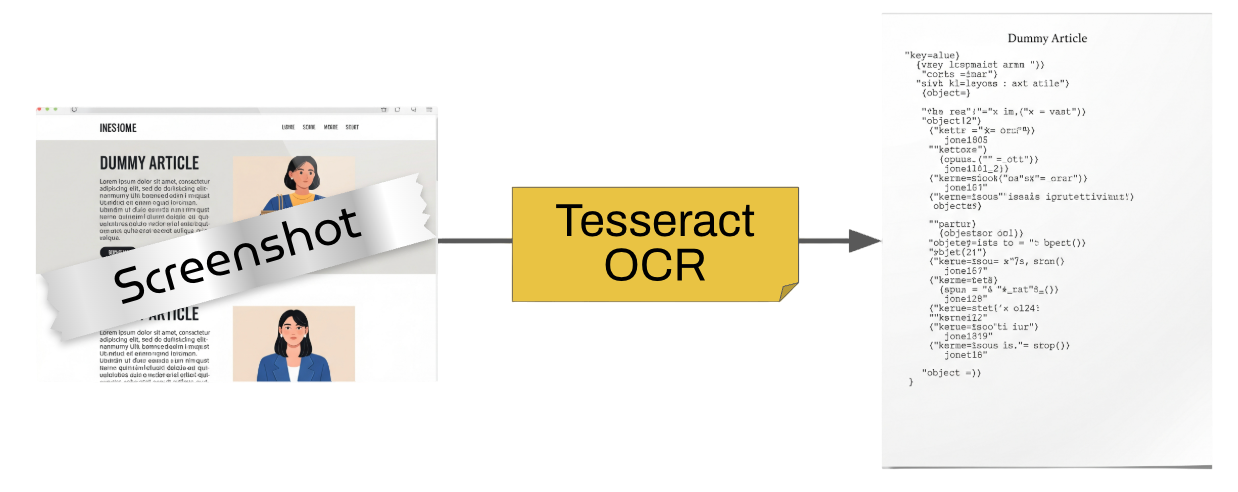
Working of Tesseract OCR
Using Tesseract in Python is straightforward thanks to the pytesseract wrapper library. This library provides a convenient interface to Tesseract’s capabilities, allowing us to feed it an image (or a path to a saved image) and receive the extracted text.
While Tesseract brilliantly extracts text, our AI needs a sophisticated way to intelligently understand, reason, and answer questions based on that information. This is where LlamaIndex steps in as the AI Orchestrator. LlamaIndex is a powerful data framework specifically designed to connect Large Language Models (LLMs) like Google’s Gemini with your private, domain-specific, or, in our case, screen-captured data.
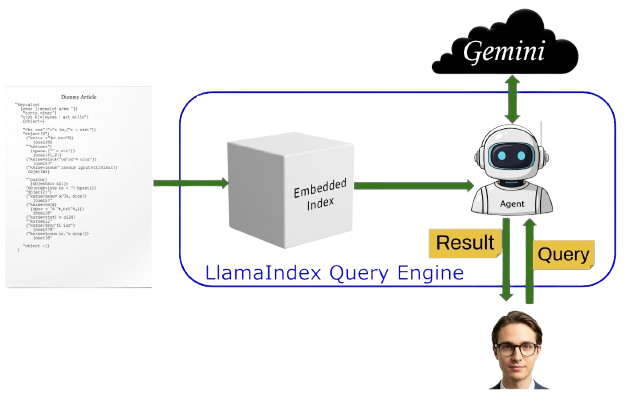
LlamaIndex workflow
In our application, LlamaIndex takes the raw text extracted by Tesseract and converts it into a searchable vector index. This indexing process allows the LLM to efficiently retrieve and synthesize relevant information when asked a question. LlamaIndex streamlines the entire workflow, from data ingestion and indexing to querying and response generation.
To successfully build and run our screen-aware AI, ensuring your system meets the necessary prerequisites and has all dependencies correctly installed is crucial. You’ll need Python 3.8 or newer. The foundational component for OCR is Tesseract. For macOS users, the recommended installation method is via MacPorts or Brew. Windows users should download and run the official Tesseract installer directly from its GitHub repository; the link has been provided in the Reference section. Once Tesseract is installed, proceed with the Python library installations using pip. “pip install screenEnv pillow pytesseract llama-index python-dotenv”
Crucially, screen capture permissions must be enabled. On macOS, go to “System Settings > Privacy & Security > Screen Recording” and grant access to your Terminal application, VS Code, or Cursor (your preferred IDE) from which you’ll execute the script. Windows users might need to adjust similar privacy settings.
import os
from screenenv.sandbox import Sandbox as OriginalSandbox
from PIL import ImageGrab, Image
import pytesseract
import platform
from dotenv import load_dotenv
from llama_index.core import SimpleDirectoryReader, VectorStoreIndex, Document
from llama_index.core.settings import Settings
from llama_index.llms.gemini import Gemini
from llama_index.embeddings.huggingface import HuggingFaceEmbedding
This initial block of code sets the stage by importing all essential libraries for our screen-aware AI. We bring in os and platform for operating system interactions, and dotenv to securely load API keys, like our Gemini key, from an .env file. For screen capture and image manipulation, screenEnv and PIL (Pillow’s ImageGrab and Image) are imported. pytesseract provides the crucial OCR capabilities. Finally, the powerful llama_index suite is imported, including core components for data indexing (VectorStoreIndex, Document), global settings (Settings), the Gemini LLM, and HuggingFaceEmbedding to convert text into numerical vectors for AI understanding.
# --- Patch pytesseract to handle non-UTF-8 error output ---
def safe_get_errors(error_string):
   """Safely decode Tesseract error output, replacing undecodable bytes."""
   try:
       return [
           line
           for line in error_string.decode("utf-8", errors="replace").splitlines()
           if line
       ]
   except Exception:
       return ["[pytesseract] Could not decode error output."]


# Apply the patch
pytesseract.pytesseract.get_errors = safe_get_errors
This crucial code block addresses a common challenge when integrating pytesseract, handling potential UnicodeDecodeError issues stemming from the underlying Tesseract engine’s error messages. The safe_get_errors function is defined to proactively decode any error output from Tesseract, replacing characters that aren’t valid UTF-8. This prevents our script from crashing if Tesseract produces malformed or non-standard error strings. By assigning this custom function to pytesseract.pytesseract.get_errors, we effectively “patch” the library. This ensures a more robust and fault-tolerant OCR process, allowing the application to continue running smoothly even if Tesseract encounters an internal decoding hiccup.
# --- Patched Sandbox for macOS screenshots ---
class PatchedSandbox(OriginalSandbox):
   def screenshot(self):
       # Use PIL's ImageGrab for screenshots on macOS
       if platform.system() == "Darwin":
           return ImageGrab.grab()
       return super().screenshot()
This code defines PatchedSandbox, a custom class that extends screenEnv’s OriginalSandbox to ensure reliable screen capture, especially on macOS. It overrides the default screenshot() method. Specifically, if the operating system is “Darwin” (macOS), it leverages PIL.ImageGrab.grab() for capturing the live desktop, which is often more effective than screenEnv’s default for direct screen interaction on Mac. For all other operating systems, it gracefully falls back to screenEnv’s standard screenshot mechanism. This customization ensures a robust and cross-platform compatible way for our AI to consistently “see” the active screen content.
def get_current_context():


   with PatchedSandbox() as s:
       raw_img = s.screenshot()


       # Prepare temp directory for saving screenshots
       temp_dir = os.path.expanduser("~/screenenv_temp")
       os.makedirs(temp_dir, exist_ok=True)
       temp_ocr_path = os.path.join(temp_dir, "temp_ocr.png")


       # Save the screenshot directly (raw_img is a PIL Image)
       raw_img.save(temp_ocr_path)


       # Run OCR on the saved image
       ocr_text = pytesseract.image_to_string(temp_ocr_path, lang='eng')
       return ocr_text
This get_current_context function is the core mechanism enabling our AI to “read” your screen. It utilizes the PatchedSandbox to capture a screenshot, which is received as a PIL Image. This image is then temporarily saved to a designated directory (~/screenenv_temp/temp_ocr.png). Finally, the path to this saved image is passed to pytesseract.image_to_string, which performs Optical Character Recognition. The function then returns the extracted OCR_text, effectively translating the visual content of your screen into a machine-readable format for subsequent AI processing.
# Load environment variables (for Gemini API key)
load_dotenv()
llm = Gemini(model="models/gemini-1.5-flash", api_key=os.getenv("GEMINI_API_KEY"))


# Set LLM and embedding model for LlamaIndex
Settings.llm = llm
Settings.embed_model = HuggingFaceEmbedding()
This code block sets up the core AI models that power our application. First, load_dotenv() securely retrieves our Gemini API key from the .env file, preventing sensitive information from being exposed in the code. We then initialize ‘llm’ with Google’s Gemini 1.5 Flash, a powerful and efficient language model. Crucially, we configure LlamaIndex’s global Settings. ‘Settings.llm = llm’ tells LlamaIndex to use Gemini for all natural language generation and reasoning tasks. Settings.embed_model = HuggingFaceEmbedding() configures the application to use a HuggingFace model for generating vector embeddings, which are numerical representations essential for LlamaIndex to semantically understand and retrieve relevant information from the screen-text.
def create_index_from_screen(ocr_text):
   doc = Document(text=ocr_text)
   index = VectorStoreIndex.from_documents([doc])
   return index


def ask_agent_question(index, question: str):
   agent = index.as_query_engine(similarity_top_k=3)
   response = agent.query(question)
   print(f"\n[🔍] Q: {question}\n\n🧠 A: {response}")
This code block demonstrates how to activate our AI’s ability to understand and respond to questions about the screen content. The create_index_from_screen function takes the OCR’d text and transforms it into a searchable VectorStoreIndex. This index, built using LlamaIndex’s capabilities, organizes the screen’s text semantically. The ask_agent_question function then leverages this index by converting it into a query_engine. When a question is posed, the query_engine uses our configured Gemini LLM to retrieve relevant information from the indexed screen content and synthesize an intelligent, context-aware answer.
if __name__ == "__main__":
   # Step 1: Capture screen and extract text
   ocr_text = get_current_context()
   if not ocr_text or not ocr_text.strip():
       print("No text found in screenshot, skipping indexing and querying.")
       exit()


   # Step 2: Create index from OCR text
   index = create_index_from_screen(ocr_text)


   # Step 3: Ask questions about the screen content
   ask_agent_question(index, "Summarize what I’m reading right now.")
   ask_agent_question(index, "What does this document relate to?")
   ask_agent_question(index, "List 3 advanced terms and explain them.")
This main execution block (if __name__ == “__main__”:) orchestrates the entire screen-aware AI workflow. It begins by calling get_current_context() to capture the screen and extract text using OCR. A crucial check ensures that if no text is found, the process exits gracefully. If text is extracted, create_index_from_screen() then builds a searchable knowledge base from this content. Finally, the script demonstrates the AI’s capabilities by posing several example questions about the screen’s content to the ask_agent_question() function, showcasing its ability to summarize, identify relationships, and explain terms.
With all components configured, running our screen-aware AI is straightforward: simply execute the main script from your terminal. Upon launch, the application will quietly capture your current screen, process the visual information with Tesseract OCR, and then intelligently index the extracted text using LlamaIndex and your configured Gemini LLM.
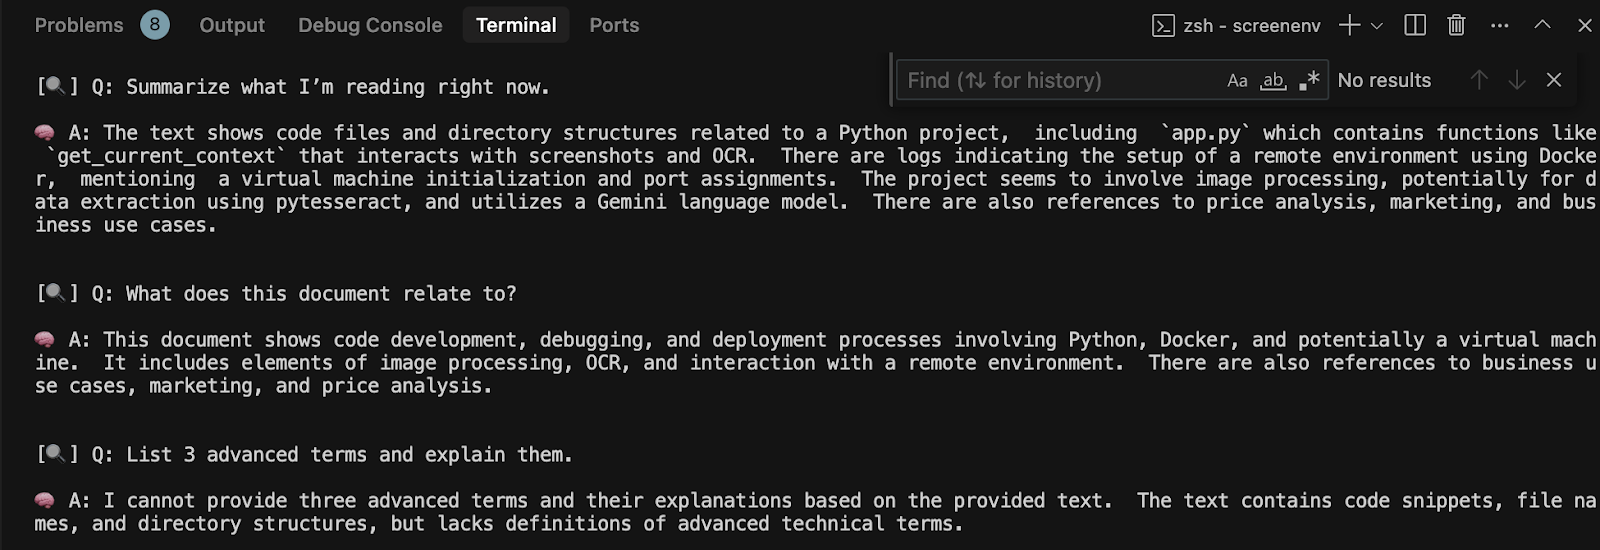
Result Output on Terminal
The provided output clearly demonstrates the AI’s immediate contextual understanding. When prompted to “Summarize what I’m reading right now,” it accurately grasps the essence of code files, directory structures, and deployment logs, even identifying technologies like Docker and pytesseract. Similarly, the response to “What does this document relate to?” correctly deduces the overarching theme of code development, debugging, and image processing. The interaction for “List 3 advanced terms…” is equally insightful; the AI accurately reflects its limitation, acknowledging that while it processes the text, it won’t hallucinate definitions not explicitly present in the observed screen content.
You now have a foundational system that bridges the gap between raw pixels and meaningful insights. But this is just the beginning! To truly unleash its potential, consider transforming this script into a more accessible application. You could build an intuitive Streamlit application on top of it, creating a user-friendly interface to trigger screenshots, input questions, and view responses directly in your browser. Alternatively, integrate this core logic into a larger web application or desktop utility, allowing you to trigger screen capture and Q&A from any page or context, enabling a truly omnipresent AI assistant. The path to a smarter, more integrated digital experience starts here. Keep experimenting!


![[Upcoming Webinar] Autonomous Enterprises: How to leverage Agentic AI in Enterprises?](https://adasci.org/wp-content/uploads/2025/10/Adasci-Webinar-1-300x300.png)